Author: Ajay

  • How To Install WordPress With One Line Of Code

    How To Install WordPress With One Line Of Code

    Install WordPress With Just One Command
    Install WordPress With Just One Command

    There are two ways to install WordPress. First is to download zip file, upload on your web host and unzip files. It’s messy and unproductive.

    The second method and most productive way to install WordPress is via command line. Most of people again use few commands to install WordPress.

    Here is what genius techies like us do, run one line of command and install WordPress.

    Login to your web host and go to the root folder of domain where you want to install WordPress.

    Copy and paste following command line and viola, your WordPress is installed.

    wget http://wordpress.org/latest.tar.gz; tar xfz latest.tar.gz; mv wordpress/* ./; rm -rf ./wordpress/; rm -f latest.tar.gz

    Add Alias to the above command

    If you have a web host such as a dedicated host and wish to install many WordPress sites then you can add above command line as alias in your bash profile.

    vi ~/.bashrc

    Copy and paste following line

    alias installwp='wget http://wordpress.org/latest.tar.gz; tar xfz latest.tar.gz; mv wordpress/* ./; rm -rf ./wordpress/; rm -f latest.tar.gz'

    Save file and run following command

    source ./.bashrc

    Next time you want to install a WordPress on a domain then go to the home directory (www) of that domain and run following command

    installwp

  • How To Clear Recent File List in Photoshop

    How To Clear Recent File List in Photoshop

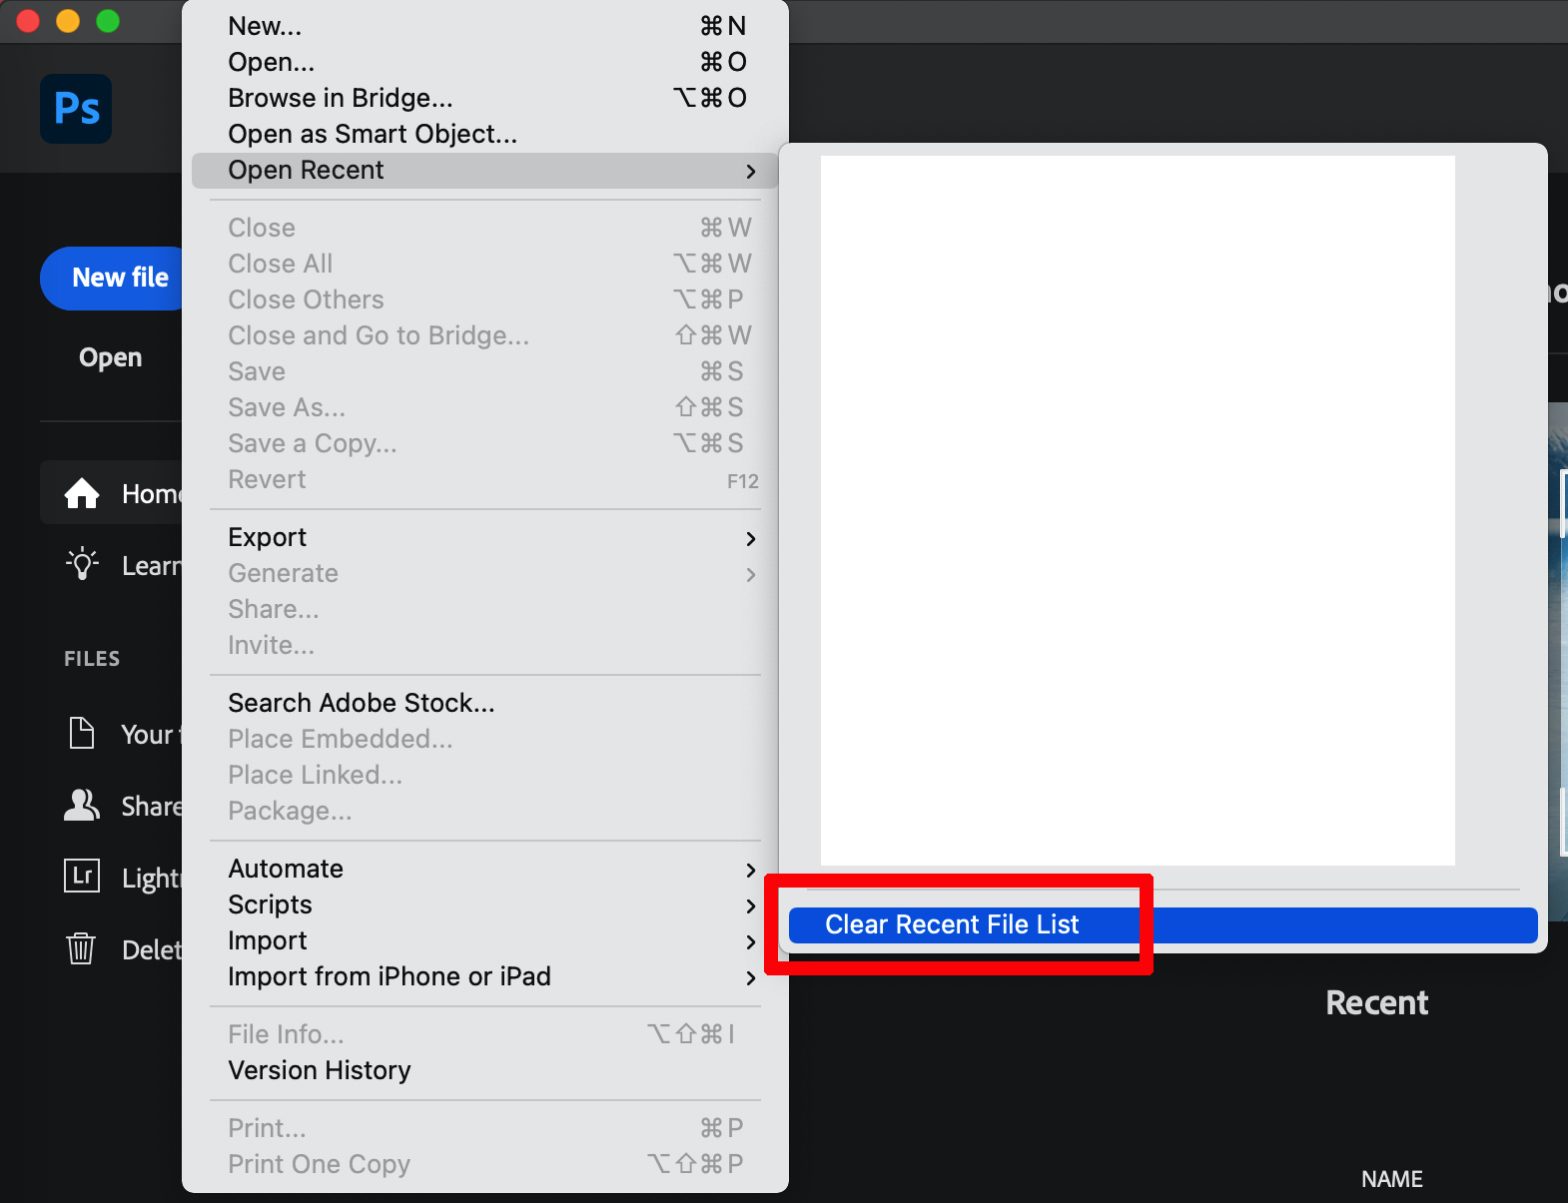
    From File menu click on Open Recent and then click on Clear Recent File List to clear recent file list from Photoshop.

    Clear Recent File List in Photoshop
    Clear Recent File List in Photoshop
  • How To Post On Instagram From Safari Web Browser on Desktop PC/Laptop/iMac/Macbook

    How To Post On Instagram From Safari Web Browser on Desktop PC/Laptop/iMac/Macbook

    Instagram is a mobile app and it is not built for computer devices such as desktop PC, Laptops, Macbooks and iMacs. This is a pitty because when I build any mobile app I always build web app too. Not having a web app for a mobile app just doesn’t make any sense at all. When I’m working on computer I prefer to use all mobile apps from the computer if their desktop PC version is available. Desktop PCs are also more productive specially for people like me who are developers.

    The good news is that we can add posts on Instagram from desktop PC browsers including safari. To post on Instagram from Safari web browser follow these instructions. These instructions are for MacOS. If you are using Windows then you can follow same steps.

    From Safari menu click on Preference and then on Advance tab.

    Safari – Peeference menu on MacOS

    On Advance Tab check the option Show Develop menu in menu bar.

    Show Develop menu in menu bar

    Once this option is checked, you will see Develop menu. From Develop menu select the appropriate mobile user agent.

    Safari – User Agent

    One this option is selected safari browser will show mobile view. Go to instagram and you will see a familiar mobile app menus. Check the bottom tabs. Click on + icon to post on Instagram.

    Instagram on Safari web browser in mobile view
    Instagram on Safari web browser in mobile view

    Don’t forget to change user agent to Default when you are done.

  • Action Required: Your app is not compliant with Google Play Policies – [Solved]

    Action Required: Your app is not compliant with Google Play Policies – [Solved]

    It’s a pretty simple solution to this problem but took me wee bit of time to figure it out which should have been straight forward. Thanks to complex maze of Google Play Console it’s not as straight forward unless you already know it.

    Received following email/message from the Google.

    Your Data safety form is available now

    Earlier this year, we announced new policy requirements for the upcoming Data safety section in Google Play . With this feature, you’ll have a clear way to show your users how you keep their data safe and explain what data your app collects and why. Your Data safety form is ready for you to fill out. Go to App Content in your Google Play Console to get started. Timeline February: Users will see the Data safety section in Play store If your information is not approved, your section will say “No information available.” April: Deadline to have your privacy policy and Data Safety form approved. Without an approved section, your new app submission or app update may be rejected. There may also be additional enforcement actions in the future.

    So in order to keep the men in Mountain View, California, United States happy I decided to update the data safety form. After updating I received another email:
    Action Required Your app is not compliant with Google Play Policies Email from Google

    Looks like privacy url was incorrect. So begins the journey to find out where the privacy url is.

    I thought it will be easily accessible from main store listing as that’s the place where it used to be? I don’t remember though. On Apple App store it’s the main store listing page where you can specify the privacy URL.

    After wasting a lot of time I finally manage to figure out the location of privacy URL field.

    The Solution

    Go to Google Play Console and select the app for which you would like to specify privacy URL. Scroll down to the bottom and you will see Policy menu. Click on App Content menu.

    Policy -> App Content

    On the App Content page, click on Manage link.

    Privacy Policy URL field

    Here you will find Privacy policy URL. Enter the correct URL here and click on Save from the bottom and you are done.

    Few minutes after saving, you will get a nice email from the HQ telling you that your app update is live.

    Don’t forget to leave comment with any suggestions or any question. I’m here to help!